
FRONT-END: Artists, musicians, level developers, and right-brained people
1) Invoking the Dreamcast
NOTE: Before you can begin invoking the Dreamcast from ESTk, you must burn dc-lool ip and load it into your Dreamcast. This doesn't require a modded or special Dreamcast. It just requires you burning the image correctly. DC-Load IP allows you to send executable files from your PC to your DC. Currently the Toolkit only supports the IP version (as opposed to the serial version), so your Dreamcast will require a broadband adapter.
You can invoke the engine from the Toolbar, by selecting the desired icon from the drop-down menu and pushing the play button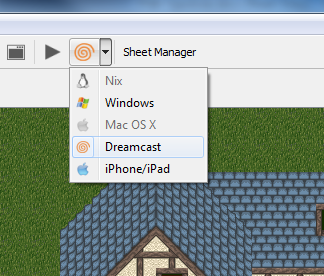
OR you can invoke the engine from the Engine file menu by selecting a platform.

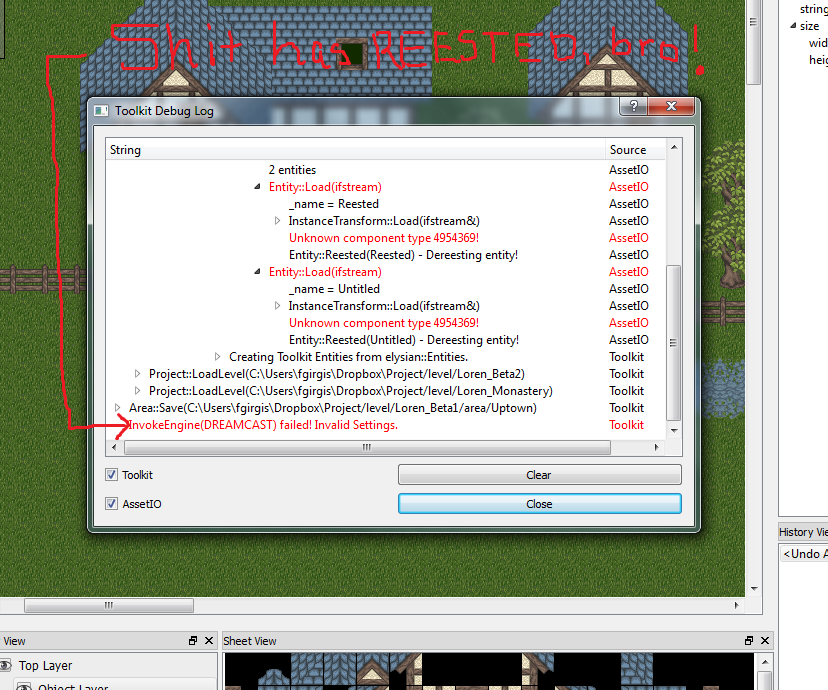
2) Error without Settings
Since this is our first time running the ESTk, we will receive an error message in the Toolkit's debug log when we try to invoke the Dreamcast bitching about our configuration.
3) Enter Dreamcast-Specific Settings
The "Engine Settings" dialog will launch, requesting Dreamcast-specific settings.
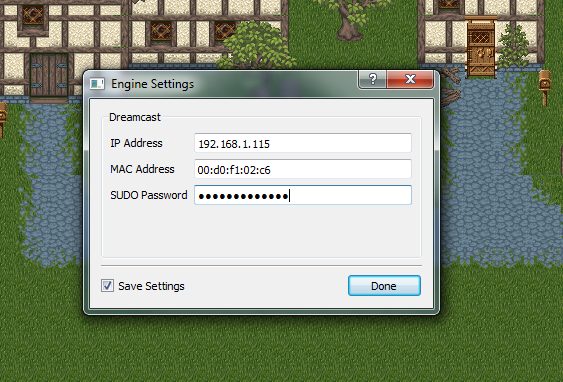
MAC Address - Hardware address of your Dreamcast's ethernet adapter. DC-Load will display this onscreen once your DC boots. (note: 00:00:00:00:00 format on Linux/OSX and 00-00-00-00-00 format on Windows)
IP Address - The desired IP address you wish to assign to your Dreamcast
SUDO Password - Only required for OSX and Linux. This is required to add an entry to your arp table for the Dreamcast. It is not saved with the rest of the settings for security reasons, so you will have to reenter every time ESTk is launched. (note: Windows does not require a password for the ARP, because the manifest embedded within the win32 executable requires you to run ESTk as an administrator).
COMMENT: Special thanks to Marcel for this dialog box... I only know how to code these fuckers by hand (never really learned to use designer), and we have decided as a team to migrate away from hand-coded widgets so that non developers can also contribute to widget design through QT designer... Marcel dropped everything on his entity framework, whipped the dialog together, rigged up all of the signals and slots, AND EVEN MADE THE BASTARD SAVE YOUR SETTINGS!
4) Reinvoke
Now attempt to reinvoke the Dreamcast. If your settings are correct, ESTk should enter an entry into your arp table for the DC and begin the transfer. You can see both dc-tool's debug output and the engine's debug output in the engine dialog within ESTk.
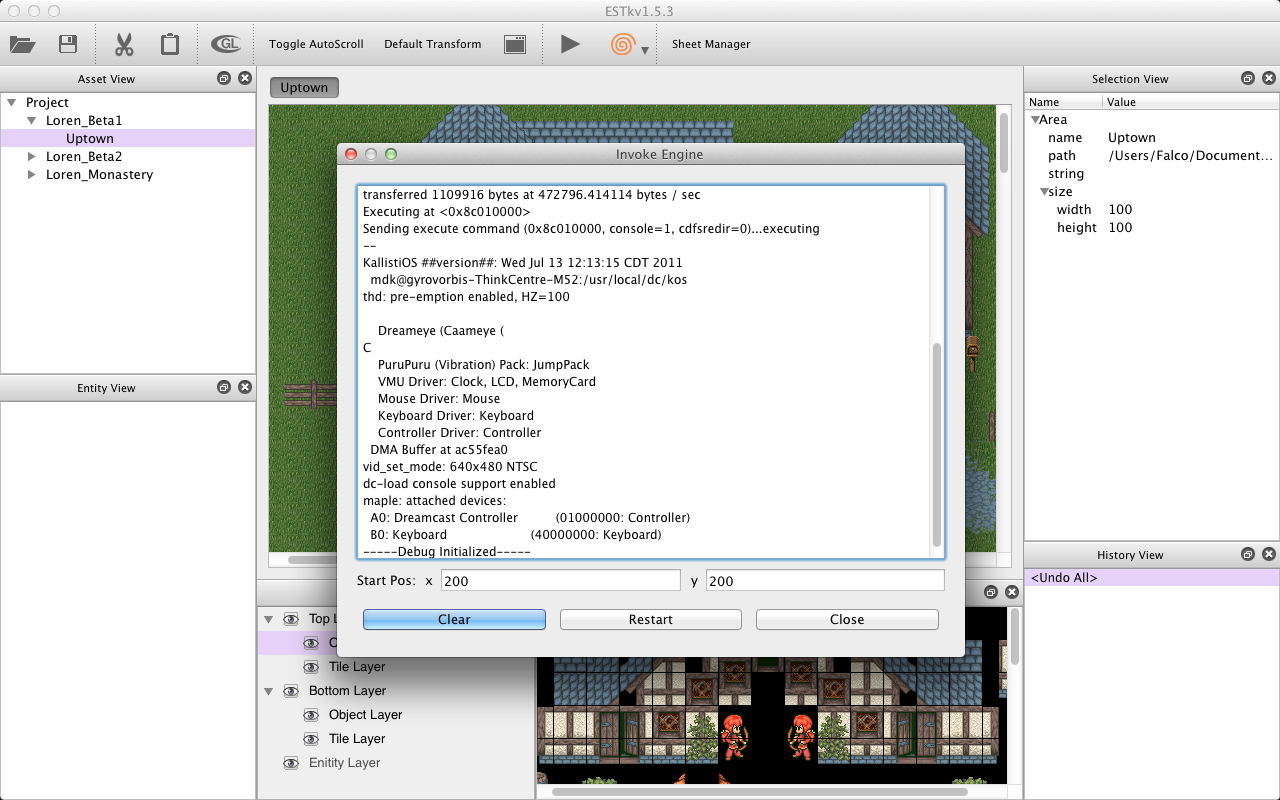
5) Enjoy Your Level on the Dreamcast!
Now you are able to play through your levels on your Dreamcast as you create them just as you would on a PC!
BACK-END: Programmers, developers, big-dick-players, and left-brained people
0) File-based Command-line Arguments
The first design problem that we ran into with invoking the Dreamcast was a lack of support for command-line arguments. ESTk has used a traditional command-line mechanism for specifying a current level or area to load within the engine on Windows, Linux and OSX. The command-line call looks something like:
[code]esgamma.exe -l C:/levels/forest -a C:/levels/forest/areas/forest1 -x 200 -y 200[/code]
This tells ESGamma the level and area to load as well as the starting coordinates for the player.
Unfortunately, dc-tool and dc-load do not pass command-line arguments to the Dreamcast when loading an executable. To circumvent this bullshit, ESGamma now searches for command-line arguments in a text file within the working directory called "gamma_args.txt" when no command-line arguments are present. This allows for the traditional, convenient method to be used with Windows, Linux, and OSX, and it allows for ESTk to generate an argument file (with the exact same format) for passing data to the Dreamcast.
1) Arping and Invoking DC-Tool
The actual behind-the scenes action taken by ESTk when you push the "play" button for the Dreamcast is pretty straightforward.
1) Save the current level and area
2) Generate gamma_arg.txt as virtual command-line arguments to the ESGammaDC
3) add arp entry for your Dreamcast
4) invoke dc-tool and send the Dreamcast build of ESGamma to your DC's IP address.
The command to execute ESGamma on the Dreamcast is:
[code]dc-tool -x ESGamma.elf -t 192.168.1.1 -c ProjectDirectory[/code]
where the 'x' flag specifies the Dreamcast binary file for the engine, 't' specifies the IP address of your Dreamcast, and 'c' specifies the PC working directory where the Dreamcast should load all of its files from.
2) Win32 dc-tool Modifications
Sounds simple enough, doesn't it? Unfortunately it's rarely ever that simple with multiplatform development. It turns out that the win32 build of dc-tool does not support the -c option (v1.0.3 had the flag, and it didn't work, then v1.0.4 took the flag out instead of fixing it). This means that ESTk has no way of telling ESGammaDC where to load the assets from. Without this, the only way to load from a custom PC directory on win32 is to hard-code the PC directory into the Dreamcast build of the engine, which is unacceptable from the Toolkit's perspective.
After desperately searching for alternatives, I realized that I had no choice other than to implement the -c flag myself. I downloaded the dc-tool v1.0.4 source and dove in.
I decided to build dc-tool with the QT Creator and the MinGW in its SDK. It wasn't too hard, but it definitely took some code changes to get the bastard compiling. Some structures from time.h were not defined, and the there is no nanosecond resolution sleep function (dc-tool really only needed ms). Also, whatever preprocessor directives were being used to check for memset() and memcpy() were wrong.
Once, I finally got the bad boy compilng, I was ready to move onto -c flag. The Linux/OSX implementation was a single function call to chroot(). This functionality does not exist on Windows, so I was tasked with finding a workaround.
I realized that every Dreamcast access (regardless of the Dreamcast's current directory) is an absolute path from root. For example, the Dreamcast requesting a tilesheet, might look like:
[code]/level/Forest/tile/tilesheet.png[/code]
Using this, I was able to store the string passed to dc-tool with the -c flag and concatenate it with every file request. For example, invoking dc-tool with -c C:/ESDev would result in the above example becoming:
[code]C:/ESDev/level/Forest/tile/tilesheet.png[/code]
Now we can force every file operation to be relative to our chroot path on Windows.
While I was at it, I also decided to add another flag '-m' to the win32 build. The '-m' flag takes a windows-formatted mac address parameter and automatically does the arp within dc-tool using the Winsock library. Now we (ESTk) can assign our Dreamcast an IP address and send it an executable with a single command.
Aaaand no article would be complete without some code... So here's all of the logic within our Invoke Engine Dialog window to invoke the bastard on the Dreamcast from every platform:
case ENGINE_DC: { //Check if we have all of the required Dreamcast settings if(_dcIpAddr.isNull() || _dcMacAddr.isNull()) return false; #ifdef Q_OS_WIN _engine->start(QString(ENGINE_DIALOG_DCTOOL_PATH)+QString(" -t ")+_dcIpAddr+QString(" -m ")+_dcMacAddr+QString(" -x ")+QString(ENGINE_DIALOG_DC_PATH)+QString(" -c ")+getCurrentProject()->getLocation()); #elif defined(Q_OS_LINUX) || defined(Q_OS_MAC) if(_sudoPswd.isNull()) return false; //required for OSX/Linux static QProcess *echo = NULL; static QProcess *arp = NULL; delete arp; delete echo; arp = new QProcess(this); echo = new QProcess(this); echo->setStandardOutputProcess(arp); echo->start(QString("echo ")+_sudoPswd); arp->start(QString("sudo -S arp -s ")+_dcIpAddr+QString(" ")+_dcMacAddr); arp->waitForFinished(); delete echo; echo = new QProcess(this); echo->setStandardOutputProcess(_engine); echo->start(QString("echo ")+_sudoPswd); _engine->start(QString("sudo -S ") + QString(ENGINE_DIALOG_DCTOOL_PATH)+QString(" -t ")+_dcIpAddr+QString(" -x ")+QString(ENGINE_DIALOG_DC_PATH)+QString(" -c ")+getCurrentProject()->getLocation()); #endif break; }
FALCO EDIT:
Another little tidbit that I forgot to mention was about arping on Windows. Arp is an OS-level networking command that requires administrative privileges. We were able to handle this on OSX and Linux by simply having the user enter their sudo password (WHICH IS NOT SAVED). Unfortunately there is no command-line mechanism on Windows for entering your administrative password... We had to do things the Windows way...
We have embedded a manifest within the Toolkit now that requests administrative permissions from Windows. This isn't really anything special, but it is in the realm of QT (a platform agnostic IDE). We found some good resources for how to add this as a platform-specific post-linker step for Windows only. We added the following to our QT project:
[code]win32 {
WINSDK_DIR = C:/Program Files (x86)/Microsoft SDKs/Windows/v7.0A
WIN_PWD = $$replace(PWD, /, \)
OUT_PWD_WIN = $$replace(OUT_PWD, /, \)
QMAKE_POST_LINK = "$$WINSDK_DIR/bin/x64/mt.exe -manifest $$quote($$WIN_PWD\$$basename(TARGET).manifest) outputresource:$$quote($$OUT_PWD_WIN\${DESTDIR_TARGET};1)"
}[/code]
This simply invokes the Windows sytem utility mt.exe which then embeds a manifest file within a prebuild executable. Our manifest file is very simple:
[code]
<?xml version="1.0" encoding="utf-8"?>
<assembly xmlns="urn:schemas-microsoft-com:asm.v1" manifestVersion="1.0">
<trustInfo xmlns="urn:schemas-microsoft-com:asm.v3">
<security>
<requestedPrivileges>
<requestedExecutionLevel level="requireAdministrator" />
</requestedPrivileges>
</security>
</trustInfo>
</assembly>
[/code]Now running ESTk will pop a Windows dialog box asking for authorization to run the application as an administrator... This will allow ESTk to perform the ARP operation. Luckily this extra build step still remains hidden from the build process thanks to the flexibility of QT's qmake...
The Policy of Pristinity has been upheld!